Monday, November 27, 2017

The Biggest Waste of Time And How To Use It

Alright, so here is my uh .. I guess actual, kind of sort of fitting (in that it at least promotes collaboration in some form), CCSF release.

In truth it's not anything all that interesting or spectacular or game-changing, but I'm pretty sure I put more hours of solid work into this than I did in the Garden Box. Heck, after writing this I feel like re-writing the Garden Box would be a piece of cake, but that's another story.

Anyway, before I stray too far off topic, allow me to present to you Advanced Protective Tub, now with bonus control panel:


This post is gonna get long, so I'll spare you the scrolling and give you the download link here. The zipfile includes the agents' catalogue file, which you may not need but it will make your life easier if you have a split installation that prevents your catalogue files from unpacking into the folder that DS actually reads them from.

When I developed the original Protective Tub, I had hoped that people would enjoy making custom name lists, and they certainly did! But the more interesting lists people developed, the more I really wanted to be able to switch easily between them without having to swap catalogue files. I also wanted to mix and match different name lists and have a few extra features to boot, so this agent is the result of my attempts to do all of those things.

Anyway, here's how you use it:

The control panel appears upon injection and allows you to choose catalogue tags from which to randomly generate first and last names for your Creatures. You can select one or several tags, add custom tags, preview tags, and choose formatting and inheritance options. Each set of this settings can be saved in different profiles, shown in the top row of icons.


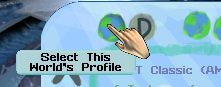
The first top-left button selects your settings profile for the current world you are in. This is the profile that actually affects the world you are in, right now! All autonaming that happens will draw from the settings in this profile, so if you feel like your settings aren't taking, make sure you've set things up under the right profile! This is the profile you will probably be using 99% of the time and it will be the profile that is already selected when you first inject the agent. Remember, if a button is grayed out, it's because you are already in that profile.

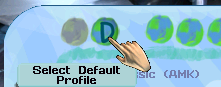
The second button is the default profile, which is what settings for new worlds will default to. If you change these settings, close the control panel, then save and load into a brand new world and inject Protective Tub, the settings for your new world will be the same as the settings you saved in the default profile. This is intended to prevent you from having to set up your ideal profile again every time you start a new world!

The last four buttons are custom profiles which you can set up to your liking, to suit specific themes, etc. Much like the default profile, these are saved across worlds, so once you set them up it should be easy to start up a new world and load settings from your favorite profile.

The last two top row buttons are Copy to World and Copy to Default. Clicking one of these buttons will apply your currently selected profile to your World or Default settings. This is the simplest way to make a custom profile active in your current world.

When you feel like you're done setting everything up, clicking the red X button will save your profile options to your Journal folder and hide the window. You can also use the Backspace button on your keyboard, if you are tired of clicking by now.

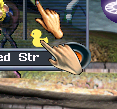
You can bring the panel back up at any time by clicking the small duck-shaped button above the selected Creature's name, or by re-injecting the agent.

If all this is information overload, rest assured that you can still enjoy Protective Tub completely from the World Profile alone. The other profiles are totally optional features and you can just ignore them if you like!

Now, the actual settings.


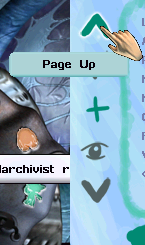
This panel uses two lists: one for the left side or first names and the other right side or last names. These lists are populated by the names of catalogue tags that contain potential creature names. You can use the up and down arrows on each side to view each list independently. If your game detects input from the scroll wheel on your mouse, you can hover over the side you which to browse and scroll up or down that way.

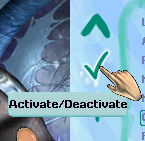
Tag names colored in green are active and will be used to generate names (if/when those settings are applied to the current world). You can activate or deactivate a tag by selecting it and either clicking the checkmark on its respective side, or by selecting it and clicking it again.  If no tags are active on the right or left side, the autonamer will be disabled until one or more tags are made active on each side. (If you wanted, you actually could deactivate all tags on your active world profile to prevent autonaming and as new creatures hatched you could switch to a custom profile and use the Test Name feature we'll explain later to generate names until you find one you'd like to apply to your hatchlings.)
There are two more buttons on each the right and left side between the select and page down buttons. The first of these is the Import button. Upon selecting this you will go into Import Mode, in which you can enter the name of a catalogue tag that you would like to add to the list.


This could be from a file you downloaded or a custom list that you made, though you can technically add any tag from the games catalogue that you like ('Moniker Friendly Names 1' is a fun one).

It's important to make sure you click the correct button-- the left import button will add the tag to the left side/first name list, and the right button will add the tag to the right side/last name list.

If you are having trouble adding your tag, make sure that the catalogue file is in the directory and check that you have entered the name of the TAG, not the file itself. You can find the tag names by opening the .catalogue file and looking for the name in quotes after the word TAG. Check the file carefully, as one catalogue file can contain multiple tags!

Please keep in mind when making your own name lists or downloading others that two of the same TAG names cannot exist, even in different files, or the game will not load! If you have downloaded or are editing an old 'random_name_bits.catalogue' file, you will need to rename both the file and the tags inside it to ensure they don't clash with other tags.

 >

>

Personally I have been using < and > to denote tags that are specifically made with for the left or right side in mind, but ultimately you can add tags you whichever side you want. I would also suggest sticking your name or initials somewhere in the tag name if you plan on releasing it to the public, just to make sure it doesn't clash with anyone else's tag names!


 The second button on each side is the Preview button. Selecting this will take you into Preview Mode for the tag you have selected. This way you can see exactly what sorts of names are available in that tag. You can also enter Preview Mode by right-clicking on a selected tag. You can scroll with the arrow buttons or using the scroll wheel on your mouse (if your game supports it). Clicking the X in either Import or Preview modes will return you to the main menu. You can also use the Backspace key on your keyboard to return from Preview Mode.

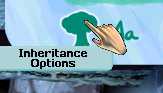
On the bottom left side are buttons for two options panels. The first is Inheritance Options which allows you to enable the passing down of name portions from parent to child. You can select for children to inherit their first, last, or a random part from their mother, father, or random parent. Selecting 'nothing' will disable inheritance altogether. You can use this to track creature families in your world, or all sorts of other interesting scenarios!

Please note, however, that manually renaming a creature through the creature profile/history panel will not update the name that it passes down to its children; it will pass down the name it was given. If you really need to rename a creature, I would suggest setting its name back to a blank one and letting the autonamer name it something else, or generate a new Test Name that you like and apply it to the creature (explained later)

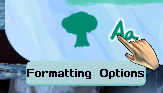
The second option is one of my personal favorites: Formatting Options, which allows you to choose whether or not there is a space between first and last names and whether or not you prefer the name parts capitalized or not. Choosing 'unaltered' will use the capitalization format already present in the catalogue files. Clicking the X button or pressing the Backspace key on your keyboard in either settings mode will return you to the main menu. Settings are saved in your currently selected profile along with your active tags.


This opens some fun and ridiculous new possibilities for naming schemes!


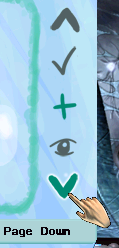
The final button on the bottom right is Refresh Test Name. This button will take your current settings into account, including active tags and formatting options, to generate an example name for a Creature! If you get a name you really like, you can apply it to your currently selected creature by clicking the name itself.

Again, when you are happy with all your configurations, you can click the X to save your options and hide the window. The Protective Tub Autonamer will continue to run in the background and assign absurd names to your unnamed creatures. Remember, you can bring the settings window back up at any time by clicking the duck-shaped button above the selected Creature's name in the upper left of your window, or by re-injecting the agent.

I really hope you all get some amusement out of this! It turned out to be a much larger project than I originally intended, but in the process I generated a fairly large amount of reusable code that should help future projects come together a little more easily. If nothing else, it was quite the wild development ride!

Finally, I got permission from Jessica of Discover Albia to convert her Star Wars, Robots, and Underwater PT name lists to the aPT format! You can download the conversions here, and then get a little more practice using the Import function:


After dropping those catalogue files into your Catalogue Folder, you'll be able to import these tags to the left side:

< Star Wars (DA)
< Robots (DA)
< Underwater (DA)

And these tags to the Right Side:

Star Wars (DA) >
Robots (DA) >
Underwater (DA) >

Of course, you can import them to both sides if you want-- nothing's stopping you! Since these tags are saved to a list in the game's journal folder, they'll be saved across worlds, so you should only ever have to import a tag once.

I hope you guys all had a wild and wonderful week. Now go forth and make all sorts of absurd names!

Sunday, November 26, 2017

How to Test CAs


Something like five and a half years ago I wrote up a post called 'CAs And You!' Since then, it's become one of the most visited and linked-to pages on this blog (that isn't an agent release, at least). But it was only a short while ago that I realized that although I had written up all this nice information about CAs, I hadn't really given you an effective way of testing them yourself. Even after releasing the Magic Words Room Edits, which at least provided visual indicators of CA links, there remained no simple way to make sure that your CAs were actually traveling properly.

It was actually Pilla (whom I consider to be one of the most wonderfully fearless developers in recent times) who expressed an interest in the code that I used to display CA values in the original post. The code I actually had was incredibly user un-friendly, so I fleshed it out a little bit. I hope it's something the average person can use now.

The command is simple "CA Tag #" (IE 'CA Tag 6') will create a little black tag under the hand (though you can move it if you wish) that will display the amount of that particular CA within the room. You can find a list of CA numbers on the Creatures Wiki page. I would recommend using this with the debug map turned on (either with the command in Magic Words Room Edits 'dmap' or by simply opening your CAOS command line and typing 'dmap 1') so that you can see the room boundaries. When you don't need the tag anymore, you can click it to remove it, or enter 'CA Tag Clear' to remove all tags.

There's a lot of amazing third-party stuff available these days, but a lot of metarooms, especially older ones, lack the proper links for CAs to properly flow. If you want to make your metarooms as creature-friendly as possible, it's important to make sure creatures can follow CAs to find food! 


Lift shafts tend to be what you want to check. In these images you can see that the more modern Chione (on the left) had properly set up CA links between the lifts, so the protein CA from the food trickles down to where creatures on the other levels can smell it. The much older Terra Reborn (on the right) was developed before the importance of CAs was widely known. As you can see, the protein CA is very high in the room where the food is, but doesn't exist at all in the room below it!

Thankfully, this is a fairly easy fix with the Magic Words Room Edits 'make ca link' command. Now you can see that the smell is travelling properly down the elevator shaft!

If you want your creatures to travel between metarooms, you may wish to also check that your doors between rooms are CA linked up too. 

While this agent should hopefully aid both developers and anyone looking to set up a proper world, it's important to remember that there are several other factors involved in proper creature navigation than just CAs. The foods in the world need to do their part and emit CAs to begin with. Your lifts need to take creatures up when they Push them and down when they Pull them. (If you mix these up as often as I do, it helps if I think of the two 'l's in 'pull' as a making a slide to go down. Sounds totally absurd, but it works) Your doors also need to properly stim for 95/Exit if they connect different metarooms or 96/Enter if they connect areas within the same metaroom. Do doors within the same metaroom sound ridiculous? Actually, there are certain circumstances in which they should be used instead of lifts, as this post by Grendel Man explains.

There sure are a lot of factors to consider in making a room navigable! Of course you could easily use these tags for other purposes, like to monitor the amount of water or nutrient in the soil. Whatever you do with them, I hope you find them useful!

Saturday, November 25, 2017

The Simple Things


I guess I've just been on an updating kick lately. This is something I meant to do a long time ago. Like probably six years ago.

The updated Creature Nametags fix a handful of things. First, the plane isn't so obtrusively high. You can now view your Creature History without a having to scroll to a room where there aren't a million nametags in your way. Secondly, it doesn't put out a bunch of trash debug info anymore, which should make things less annoying if you're a developer who uses the CAOS Debugger. And thirdly, the nametags now attempt to move around each other instead of overlapping.


You can download the updated nametags here, and I'll be amending the original release post shortly too.

Friday, November 24, 2017

Easy Multi-Agent Packaging

I gotta say, I'm really glad so many Creatures players are embracing Discord as a means to connect. Discord brings back all the fond memories of old-fashioned IRC channels like JRchat and Sine, but with tons of modern features like easy embedding of images and files into messages, not to mention all the neat bots that are out there.

I was lurking around in the Caos Coding Cave server when Pilla mentioned a wish for Monk/CAOS2PRAY to handle the PRAYing of multiple agents into a single file. I remembered that RProgrammer was extremely helpful when I first emailed him years ago about making Jagent compatible with Garden Box agents, so I figured it wouldn't hurt to see if there was something he could do about it.

As it turned out, although bringing the ancient source of Jagent out of the dusty closet for an update would be a bit too much of a project, he was generously willing to throw together a tool for us to quickly merge agents together. To quote RP: "I'm calling it Monastery because it's lots of PRAYing together don't judge me."

In the interest of throwing this tool together quickly, it reuses Monk's original backsprite (designed by Embri) because that was on-hand, but remember that this isn't Monk at all! Instead of turning cosfiles into agents (and vice versa), it simply turns multiple agents into a single agent with nothing more than a click and a drag:


The name of the new 'bundled' agent is based on the filename of the agent you happen to click on when you start dragging your selection, but you can of course rename it to something more appropriate once it's generated!

You can download Monastery here and then share and rehost it as much as you like! RProgrammer has also mentioned that if anyone wishes to design an original backsprite for Monastery, he would be happy to replace the Monk sprite with the more appropriate image.

Thanks so much RP! And happy agenting!

Hera For All

Does anyone remember Hera from like five years ago? Probably one of my more oddly specific worlds, Hera implemented a scenario script that forced an all-female world and scored creatures based on how well they cared for themselves. It promoted more self-sufficient creatures by selecting genomes from the creatures with the best scores to go into the next generation and attempted to spread creatures out in the world by impregnating the creature furthest from the group when the population dropped.

I have distributed a few copies of my Hera script over the years to people who requested them via email, but I have wanted to write a more user-friendly version for a long time. So I got around to doing that!

Here is what the Scenario Script for Hera does, in brief terms:

  • Exports males and ensures all eggs are female
  • Once creatures are old enough, assigns them a score based on their drives. Creatures with lower drives will have a lower score. You must have Creature Nametags installed to see the scores, but the script should function without them.
  • Ensures the population continues by impregnating a norn with a mix of genetics from the lowest scoring creatures when the population drops below the limit.
  • Alters the life chemical of creatures based on their score, so creatures who cannot take care of themselves age and die quickly while low-scoring creatures stick around longer.

Additionally, this for-release version includes several Magic Words commands so you can tweak certain settings to your liking!

Basic Commands
  • Hera Favor: This will reduce the selected creature's score next time it is calculated, giving it a greater chance to survive and pass on its genes even if it isn't doing so well.
  • Hera Score Reset: Resets all creature's scores to 50, giving them all a chance to start over. Useful if you've recently moved the population to a new metaroom or world. This will go into effect the next time score is calculated.
  • Hera Difficulty # : Set a number from 1 (very easy) to 10 (very difficult). This affects how gently or harshly creatures are scored. Default is 5.
Advanced Commands
  • Hera Score Rate # : Set a number from 1 to 100 that will affect how quickly score changes take place. Lower values will cause the score to reflect more current drive levels, while higher values will reflect a creature's drives over a longer period of time. Setting this to 100 will freeze scores in place. Default is 50.
  • Hera Range #-# : Set a range of numbers such as 10-90 or 40-60 that defines the 'neutral zone' within which a creature will not see any changes to their lifespan. Creatures with a score lower than the first number will live longer lives, while creatures with a score above the last number will not live as long. Default is 20-90. 
  • Hera Life #/# : Set two numbers such as 5/15 or 20/90 representing Reward and Penalty respectively. These numbers affect the amount of life a creature gains or loses if its score falls outside the values set in Hera Range. Suggested values are between 1 and 100 but higher values can be set with caution. Defaults are 50/50.
Download Scenario Script Hera here! (Updated 12/7/21*) A huge thank you to KittyTikara of The Mobula Ray for all the detailed testing and feedback on this script. 

I know this is kind of a weirdly specific scenario to run, but I always kind of hope it'll spark more interest in unique gameplay styles. I am particularly charmed by both SpaceShipRat's Creatures Scenario Generator and c1anddsaddict's C3/DS Game Generator. Do any of you take inspiration from things like these? Are there any scenarios you've come up with that could be made easier or fully automated with scripts?

*Note: Hera was updated on 12/7/21 to add a "Hera Pause" command. The update post is here, and the old version is here if you want it for some reason.

Thursday, November 23, 2017

Some Yule Nostalgia


Do any of you remember the 1999 Creatures 3 Yule Pack? I remember that year all I wanted for Christmas was Creatures 3. I had spent the last almost two months dying of jealousy as I watched other members of the community play their copies, just released at the beginning of that November. My naive and hopeful child mind believed that in the worst case scenario, someone would 'simply' convert the C3 world, breeds, and agents to work in C2, of course! Oh, the absurd faith I had in the sorcery of the development community, like they could just wave a magic wand and make all our dreams come true! Kid-me wanted nothing more than to join their ranks, but even now knowing as much about CAOS as I do, I cringe at the idea of attempting such a project, knowing how much effort such a venture would have been and how vastly different and limited the final product would be to even sort of work within C2.


But thankfully I did find my copy of Creatures 3 under the tree and did not have to spend years hoping a developer would undertake such an absurd project. Though I'm sure I got other gifts that year, I certainly don't remember any of them. Perhaps that's why the old C3 Yule pack holds so many memories for me, as it was part of my introduction to the game as well as my holiday memories.

I've been wondering for a while if anyone's ever converted the agents to work in undocked DS worlds, but so far my searches have yielded only one result, KittyTikara's Modified Yule Lights (and they are fantastic!) So I decided to take a stab at the rest of them, just to appease my nostalgic soul. Most of them are pretty quick and dirty conversions, but I did add missing stims to several of the toys and tweaked a few other things along the way that I've forgotten the details of by now.


You can download the pack here! It contains the following agents:

  • Yule Booze
  • Yule Car
  • Yule Crackers
  • Yule Ettin Tree
  • Yule Fireworks
  • Yule Food
  • Yule Ettin Tree
  • Yule Norn Tree

You'll still need C3 installed for some of the agents that borrow C3 sprites, like the Crackers. I did not convert the SuperClean kit (I just didn't find it terribly necessary or festive, sorry) or the Yule Lights (since a great conversion has already been done).

If you're a fan of Creatures lore, I will make one very strong recommendation for this pack. Take a look at the in-game help files for each object! There's an awful lot of amusing and silly hints at the origins of traditions among the norns, ettins, grendels, and shee alike.

Maybe it's a little early, but I hope you all have a lovely holiday season!

Half-Lives and Other Genetic Mysteries

So I found out something recently. I think the official C3 genetics kit has been lying to us this whole time.


If you've ever messed around in the genetics kit, chances are you have at some point come across the massive Half-Life gene. This single gene is responsible for determining the rates at which every single chemical in a creature's bloodstream degrades. By selecting a chemical and moving the half-life slider bar, you can determine how long it takes for a chemical to drop to half its original value. Lower values result in a faster degradation, while higher values are slower. If you watch the bottom bar of your genetics kit window, you will see what that time is estimated to be, from 50 milliseconds at 0, to 148.8 years at 255.


But while I was looking at the half-life of the Life chemical in an average ChiChi, 99, I noticed the genetics kit claims that half life only amounted to 15 minutes. And well, that just doesn't make sense.


The "die of old age" receptor kicks in when Life drops to 0.02. And we already know that tends to happen around the 5h39m mark. But if the half-life chemical is really 15 minutes, that would mean:

15 minutes after birth Life would be 0.5
15 more minutes later, or 30 minutes after birth Life would be 0.25
45 minutes after birth Life would be 0.125
60 minutes after birth Life would be 0.0625
75 minutes after birth Life would be 0.03125
and 90 minutes after birth Life would be 0.015625, which is below the 0.02 mark at which a ChiChi dies of old age. And we all know norns live a lot longer than that! What's going on here?

I wrote up a script to output some information about a Creature's life chemical to the debug log, and this is what I found:

Contrary to what the Genetics kit tells us, the half-life of 99 seems to actually be closer to an hour.


I was curious as to how this scaled, so I set Life to have a half-life of 88, or what the genetics kit considers to be five minutes.


And it was actually more like twenty.

I did several more tests with different values (and different chemicals too, just to be certain this wasn't something with Life specifically) and came to the same conclusion. The half-life time specified in the genetics kit is actually only about 1/4th the actual half-life.

But why? Such a vast difference seems like kind of a big oversight, doesn't it? Well, I'm not certain exactly why, but I have a theory. As I continued to run more tests to learn more about half-lives, I wrote a script that output the amount of a chemical every tick. And that's when I noticed it.


See the pattern? It appears that the engine only processes chemical degradation in creatures once every four ticks. So it would make sense to consider that the C3 genetics kit was developed during a time when that was not the case. If the chemicals did indeed degrade each tick, then the times specified in the kit would match up! It seems possible to me that the process rate was changed sometime after the genetics kit was developed and no one ever thought to update it.

Before I wrap this up, I have one more bit of information to share. While I was testing different half-lives I noticed that despite what the genetics kit claimed, any chemical with a half-life setting greater than 171 never degraded. Ever. All chemicals with half-life settings between 172 and 255 stayed the same and only lowered if they were used up through other chemical reactions. Why is 172 the magic number? I honestly have no idea. Ultimately this information probably has no practical use, since a half-life of 172 would take real-time months to degrade anyway and norns generally don't live that long, but it's still quite an interesting mystery to me.

Anyway, I hope the results of these experiments have left you a little more informed about half-lives. If anyone else has done similar experiments, I'd be interested to see if you got the same results or discovered anything that might be contrary to these findings!

Wednesday, November 22, 2017

On Vocabulary Lessons

I actually gave the Magic Words Core a small update recently. One of its weirder flaws was that if it was injected multiple times, it would respond to commands multiple times, including bringing up the multiple copies of the help menu. This generally wasn't a huge issue, but it could be a bit of annoyance if you placed the core's cosfile in your bootstrap, then forgot you had done that and injected it too. This recent update should reduce the chances of that happening quite a bit.

While playing through my last world, I ended up making another update to an older agent-- this one to the Magic Words Hand-Teaching module. Just to refresh you, this was a module that allowed teaching norns a word by simply typing 'teach [word]'. It was my attempt at finding a pleasant hybrid between the instant-learn method of the Holistic Learning Machine (and the Stones of Knowledge) and the dull, tedious grind of the Learning Computer (which more often than not resulted in me dumping the newborns into the learning room and then going off to do something else for a while). I wanted a method of teaching my creatures that was a little more hands on, and Magic Words seemed to offer me the solution. 

 I still really enjoy hand-teaching my norns when possible, but sometimes I don't want to type out 'teach hungry for protein.' Nor can I always remember the names of all the drives off the top of my head. And one of the more frustrating aspects of Hand Teaching is when a creature has a high drive but can't tell you what it is yet (and all your guesses are incorrect). So this update was written to address those issues. It has the same functionality of the original, but includes a few new commands:

Teach Random will teach creatures a random, non-noun word. I've found that using this command on occasion during normal care takes a lot of the frustration out of hand-teaching creatures Literally Every Word, which can become so tedious especially when your favorite pair just had their eighth child.  Just making a habit of using it every so often to teach a couple words here and there allows creatures to eventually learn everything without taking all the personal hand-norn interaction out of the process. The Vocab-Bot has the same effect, just in a toy form.


Teach Drive will teach the name of the currently selected creature's highest drive. One of the first words I teach creatures is "express" but that doesn't do a whole lot of good when they stand there shouting "Clover rly boop" over and over again. While they would otherwise probably end up learning a lot of other words while I attempt to figure out what they actually need, this tends to simplify the process a little.


Teach Qualifier and Teach Hunger both accomplish similar purposes as just being shortcuts for the teaching the categories of words I don't always feel like typing out. The first will teach a random word like Very, Extremely, etc., and the second will teach a random of the three hunger drives.

I might be the only one who enjoys this particular playstyle, but just in case I'm not, you can download the updated version here. I hope you enjoy!